In order to use your account in NSB, you have to prepare it manually on Amazon website.
We will walk you through the steps required to get your account ready.
Steps
Login to your account on Amazon and click settings in top right corner. You will get this:
Let’s setup account authenticator and create account phrase.
Click on “Access and security settings” (number 1 in picture above), you will get the following screen:
Click Manage. You will get redirected to “Authenticator screen” as follows:
Click the “Authentication App” checkbox (1 in picture).
Click “Can’t Scan the barcode” (2 in picture).
Now, copy these characters. These represent your account’s phrase (with spaces included between characters). When adding your account in nsb, you have to add it like this: email:password:accountphrase.
We still have to fill the OTP, in order to get the OTP and fill it, you may use any online tool. For example, you may use: https://totp.danhersam.com/ Add the account phrase and use the generated OTP code (add it in field 3 as shown in picture). Click on “Verify OTP code and continue”.
You will be redirected to the following screen where you have to click on “Ok. Enable two-step verification”:
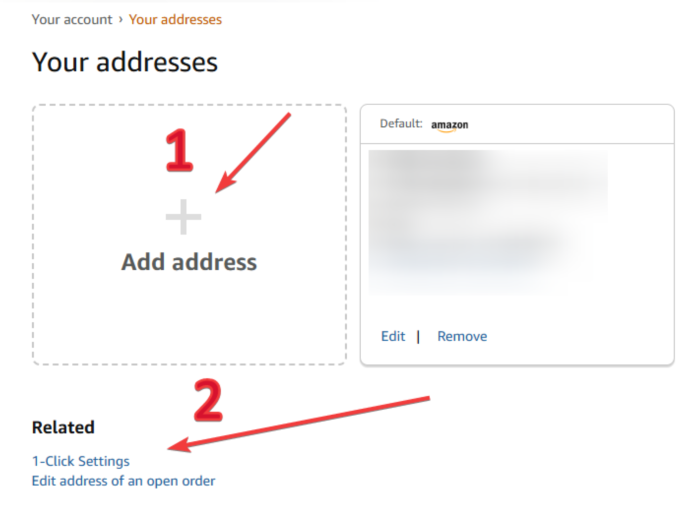
Done preparing Authentication, now go back to account settings. Click “Addresses” (2 in picture below):
You will get the following screen, make sure to add an address (step 1 in the picture below):
Then click on “1- Click Settings” (step 2 in picture above). The following window will open, toggle the button in top right corner (as shown in picture below).
Note: If you didn’t get this toggle button, you can ignore this step.
Done adding address, now go back to account settings and click “My Payments” (3 in picture below):
Once you reach “Wallet” screen, make sure to add your payment by click on “Add a payment method”:
After finishing all these steps, you can now use your Amazon account to checkout items smoothly in NSB!